When you launch a simulation from the IDE, by default it will be started with Tkenv. When it does not, you can explicitly select Tkenv in the Run or Debug dialog.
Tkenv is also the default when you start the simulation from the command line.
When necessary, you can force Tkenv by adding the -u Tkenv switch to the command line.
The complete list of command-line options, related environment variables and configuration options can be found at the end of this chapter.
On startup, Tkenv reads the ini file(s) specified on the command line (or omnetpp.ini
if none is specified), and automatically sets up the simulation described in them.
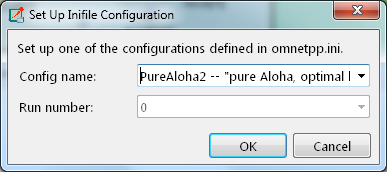
If they contain several simulation configurations, Tkenv will ask you which one you
want to set up.
Once a simulation has been set up (modules have been created and initialized), you can run it in various modes and examine its state. At any time you can restart the simulation, or set up another simulation. If you choose to quit Tkenv before the simulation finishes (or try to restart the simulation), Tkenv will ask you whether to finalize the simulation, which usually translates to saving summary statistics.
Functions related to setting up a simulation are in the File menu. Some of these functions are:
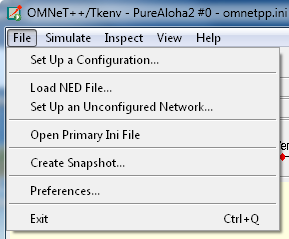
This function lets you choose a configuration and run number from the ini file.
Simulation-related functions are in the Simulate menu, and are accessible via toolbar icons and keyboard shortcuts as well.
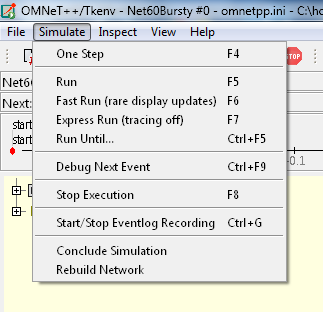
Step lets you execute one simulation event, that at the front of the FES. The next event is always shown on the status bar. The module where the next event will be delivered is highlighted with a red rectangle on the graphical display.
In Run mode, the simulation runs with all tracing aids on. Message animation is active and inspector windows are updated after each event. Output messages are displayed in the main window and module output windows. You can stop the simulation with the Stop button on the toolbar. You can fully interact with the user interface while the simulation is running (e.g. you can open inspectors, etc.).
Note
If you find this mode too slow or distracting, you may switch off animation features in the Preferences dialog.In Fast mode, animation is turned off. The inspectors and the message output windows are updated every 500 milliseconds (the actual number can be set in File|Preferences...). Fast mode is several times faster than the Run mode; the speed can increase by up to 10 times (or up to the configured event count).
In Express mode, the simulation runs at about the same speed as with Cmdenv, all tracing disabled. Module log is not recorded. You can interact with the simulation only once in a while, thus the run-time overhead of the user interface is minimal. You have to explicitly click the Update inspectors button if you want a display update.
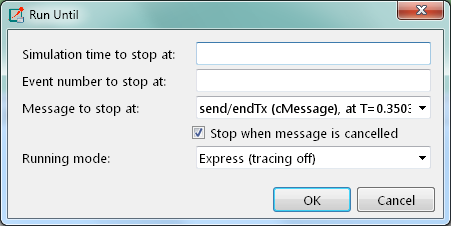
You can run the simulation until a specified simulation time, event number or until a specific message has been delivered or canceled. This is a valuable tool during debugging sessions (select Simulate | Run until...). It is also possible to right-click on an event in the simulation timeline and choose the Run until this event menu item.
It is also possible to run until an event occurs in a specified module. Browse for the module and choose Run until next event in this module. Simulation will stop once an event occurs in the selected module.
This function is useful when you are running the simulation under a C++ source-level
debugger. Debug Next Event will perform one simulation event just like Step, but
executes a software debugger breakpoint (int3 or SIGTRAP) just before entering
the module's event handling code (handleMessage() or activity()). This will
cause the debugger to stop the program there, letting you examine state variables,
single-step, etc. When you resume execution, Tkenv will get back control and become
responsive again.
The OMNeT++ simulation kernel allows you to record event related information into a file
which later can be used to analyze the simulation run using the Sequence Chart tool in
the IDE. Eventlog recording can be turned on with the record-eventlog=true ini file option,
but also interactively, via the respective item in the Simulate menu, or using a toobar button.
Note that the starting Tkenv with record-eventlog=true and turning on recording later
does not result in exactly the same eventlog file. In the former case, all steps of setting up
the network, such as module creations, are recorded as they happen; while for the latter,
Tkenv has to "fake" a chain of steps that would result in the current state of the simulation.
This function finalizes the simulation by invoking the user-supplied finish()
member functions on all module and channel objects in the simulation. The customary
implementation of finish() is to record summary statistics. The simulation cannot
be continued afterwards.
The Network Display, the Log Viewer and the Object Inspector in the main window share some common properties: they display various aspects (graphical view / log messages / fields or contents) of a given object. Such UI parts are called inspectors in Tkenv.
The three inspectors mentioned above are built into the main window, but you can open add additional ones at any time. The new inspectors will open in floating windows above the main window, and you can have any number of them open.

Inspectors come in many flavours. They can be graphical like the network view or a histogram inspector, textual like a log viewer, tree-based like an object inspector, or something entirely different.
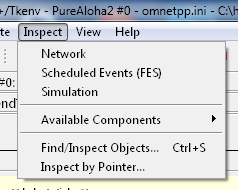
Inspectors can be opened in various ways: by double-clicking an item in the Object Navigator or in other inspectors; by choosing one of the Open... menu items from the context menu of an object displayed on the UI; via the Find/Inspect Objects dialog (see later); or even by directly entering the C++ pointer of an object as a hex value. Inspector-related menu items are in the Inspect menu.
Inspectors always show some aspect of one simulation object, but they can change objects. For example, in the Network View, when you double-click a submodule which is itself a compound module, the view will switch to showing the internals of that module; or, the Object Inspector will always show information about the object last clicked in the UI. Inspectors maintain a navigable history: the Back/Forward functions go to the object inspected before/after the currently displayed object. Objects that are deleted during simulation also disappear from the history.
When you exit and then restart a simulation program, Tkenv tries to restore the open inspector windows. However, as object identity is not preserved across different runs of the same program, Tkenv uses the object full path, class name and object ID (where exists) to find and identify the object to be inspected.
Preferences such as zoom level or open/closed state of a tree node are usually maintained per object type (i.e. tied to the C++ class of the inspected object).
It is possible for the user to contribute new inspector types without modifying Tkenv code. For this, the inspector C++ code needs to include Tkenv header files and link with the Tkenv library. One caveat is that the Tkenv headers are not public API and thus subject to change in a new version of OMNeT++.