The easiest way to launch a simulation is by selecting a project, folder, ini or NED file in Project Explorer, and clicking the Run button on the toolbar. This will create a suitable launch configuration (possibly after asking a few questions to clarify what you want to run) if one does not exist already. Instead of the Run button, you can also choose the Run As... | OMNeT++ Simulation from the item's context menu.
The details:
- If a folder is selected and it contains a single INI file, the IDE will use this file to start the simulation.
- If an INI file is selected, it will be used during the launch as the main INI file for the simulation.
- If a NED file is selected which contains a network definition, the IDE will scan for INI files in the active projects and will try to find a configuration that allows this network to start.
Launch configurations can be managed in the Run Configurations dialog. (Two further dialogs, Debug Configurations and Profile Configurations are very similar, and allow you to manage debugging/profiling aspects of launch configurations).
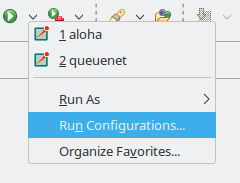
The Run Configurations can be opened in various ways: via the main menu (Run | Run Configurations...); via the context menu item of a project, folder or file (Run As | Run Configurations...); via the green Run toolbar button (Run Configurations... item of its attached menu, or by Ctrl-clicking any other menu item or the toolbar button itself).
OMNeT++ IDE adds a new Eclipse launch configuration type, OMNeT++ Simulation, that supports launching simulation executables. To create a new run configuration, open the Run Configurations... dialog. In the dialog, select OMNeT++ Simulation from the tree, and click the New launch configuration icon in the top-left corner. A blank launch configuration is created; you can give it a name at the top of the form that appears.
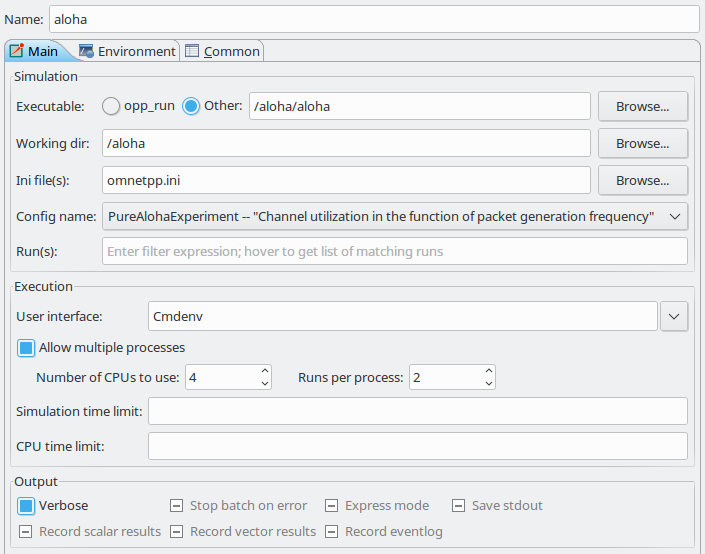
The Main tab of the configuration dialog was designed to make the launching of simulations as
easy as possible. The only required field is Working directory; all others have defaults. If you
only select the working directory and the simulation program, it will start the first configuration
from the omnetpp.ini file in the specified working directory.
Tip
Hover your mouse above the controls in this dialog and you will receive tooltip help for the selected control.Note
The Launch dialog will try to figure out your initial settings automatically. If you select an INI file in the Project Explorer View, or the active editor contains an INI file before launching the Run dialog, the INI file and working directory field will be automatically populated for you. The dialog will try to guess the executable name based on the settings of your current open projects.Executable: You must set the name of the simulation executable here. This is a workspace path. You may use the Browse... button to select the executable directly. If your project output is a shared library, select opp_run; it will cause the IDE to use the
opp_runor theopp_run_dbghelper executable with the-loption to run the simulation. Make sure that the Dynamic Libraries field in the advanced section contains the libraries you want to load.Working directory: Specifies the working directory of the simulation program. This is a workspace path. Note that values in several other fields in the dialog are treated as relative to this directory, so changing the working directory may invalidate or change the meaning of previously selected entries in other fields of the dialog.
Initialization file(s): You should specify one or more INI files that will be used to launch the simulation. The default is
omnetpp.ini. Specifying more than one file (separated by space) will cause the simulation to load all those files in the specified order.Config name: Once you specify a legal INI file, the box will present all of the Config sections in that file. In addition, it will display the description of that section and the information regarding which Config section is extended by this section. You may select which Configuration should be launched.
Note
The working directory and the INI file must contain valid entries before trying to set this option.Runs: It is possible to specify which run(s) must be executed for the simulation. An empty field corresponds to all runs. You can specify run numbers or a filter expression that refers to iteration variables. Use the comma and .. to separate the run numbers; for example, 1,2,5..9,20 corresponds to run numbers 1,2,5,6,7,8,9,20. It is also possible to specify run filters, which are boolean expression involving constants and iteration variables (e.g. $numHosts>5 and $numHosts<10). Running several simulations in this manner is called batch execution.
Tip
If the executable name and the INI file were already selected, hover the mouse above the field to get the list of matching runs.User interface: You can specify which UI environment should be used during execution. The dialog offers Cmdenv (command-line UI), Qtenv (Qt-based GUI), and Tkenv (legacy, Tk-based GUI). If you have a custom user interface, its name can also be specified here. Make sure that the code of the chosen UI library is available (linked into the executable/library or loaded dynamically).
Note
Batch execution and progress feedback during simulation are only supported when using Cmdenv.Allow multiple processes: With batch execution, it is possible to tell the launcher to keep two or more simulations running at a time or to start a new simulation process after a certain number of runs executed. This way you can take advantage of multiple CPUs or CPU cores. You can set the number of CPUs to use and the number of runs to execute in a single process.
Warning
Use this option only if your simulation is CPU-limited and you have enough physical RAM to support all of the processes at the same time. Do not set it higher than the number of physical processors or cores you have in your machine.Simulation time limit and CPU time limit can be set also to limit the runtime length if the simulation from the launch dialog in case those were not set from the INI file.
Output options: Various options can be set regarding simulation output. These checkboxes may be in one of three states: checked (on), unchecked (off), and grayed (unspecified). When a checkbox is the grayed state, the launcher lets the corresponding configuration option from the INI file to take effect.
Clicking on the More >>> link will reveal additional controls.
Dynamic libraries: A simulation may load additional DLLs or shared libraries before execution or your entire simulation may be built as a shared library. The Browse button is available to select one or more files (use Ctrl + click for multiple selection). This option can be used to load simulation code (i.e. simple modules), user interface libraries, or other extension libraries (scheduler, output file managers, etc.). The special macro
${opp_shared_libs:/workingdir}expands to all shared libraries provided by the current project or any other project on which you currently depend.Note
If your simulation is built as a shared library, you must use theopp_runstub executable to start it. opp_run is basically an empty OMNeT++ executable which understands all command line options, but does not contain any simulation code.Warning
If you use external shared libraries (i.e. libraries other than the ones provided by the current open projects or OMNeT++ itself), you must ensure that the executable part has access to the shared library. On Windows, you must set thePATH, while on Linux and Mac you must set theLD_LIBRARY_PATHto point to the directory where the DLLs or shared libraries are located. You can set these variables either globally or in the Environment tab in the Launcher Configuration Dialog.NED Source Path: The directory or directories where the NED files are read from.
Tip
The variable${opp_ned_path:/workingdir}refers to an automatically computed path (derived from project settings). If you want to add additional NED folders to the automatically calculated list, use the${opp_ned_path:/workingdir}:/my/additional/pathsyntax.Image path: A path that is used to load images and icons in the model.
Additional arguments: Other command line arguments can be specified here and will be passed to the simulation process.
Build before launch: This section allows you to configure the behavior of automatic build before launching. Build scope can be set either to build this project and all its dependencies, this project only or we can turn of autobuild before launch. Active configuration switching on build can be also configured here (Ask, Switch, Never switch.)
Most settings in the dialog simply translate to command-line options to the simulation executable. This is summarized in the following list:
Initialization files: maps to multiple
-f <inifile>optionsConfiguration name: adds a
-c <configname>optionRun number: adds a
-r <runnumber/filter>optionUser interface: adds a
-u <userinterface>optionDynamically loaded libraries: maps to multiple
-l <library>optionsNED Source Path : adds a
-n <nedpath>option
The launcher automatically decides whether the release or debug build of the model
should be started. When running, release mode binaries are used automatically.
For debugging, debug builds are started (i.e. those where the binary ends with _dbg
suffix.) Before starting the simulation, the launcher ensures that the binary is
up to date and triggers a build process (and changes also the active configuration)
if necessary.