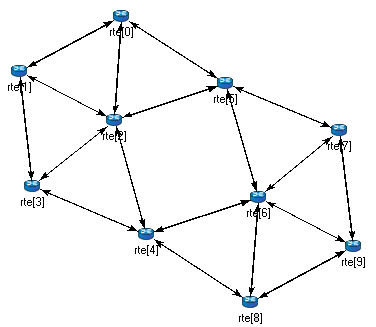
Figure: The network
The user describes the structure of a simulation model in the NED language. NED stands for Network Description. NED lets the user declare simple modules, and connect and assemble them into compound modules. The user can label some compound modules as networks; that is, self-contained simulation models. Channels are another component type, whose instances can also be used in compound modules.
The NED language has several features which let it scale well to large projects:
The NED language has an equivalent tree representation which can be serialized to XML; that is, NED files can be converted to XML and back without loss of data, including comments. This lowers the barrier for programmatic manipulation of NED files; for example extracting information, refactoring and transforming NED, generating NED from information stored in other systems like SQL databases, and so on.
In this section we introduce the NED language via a complete and reasonably real-life example: a communication network.
Our hypothetical network consists of nodes. On each node there is an application running which generates packets at random intervals. The nodes are routers themselves as well. We assume that the application uses datagram-based communication, so that we can leave out the transport layer from the model.
First we'll define the network, then in the next sections we'll continue to define the network nodes.
Let the network topology be as in Figure below.
The corresponding NED description would look like this:
//
// A network
//
network Network
{
    submodules:
        node1: Node;
        node2: Node;
        node3: Node;
        ...
    connections:
        node1.port++ <--> {datarate=100Mbps;} <--> node2.port++;
        node2.port++ <--> {datarate=100Mbps;} <--> node4.port++;
        node4.port++ <--> {datarate=100Mbps;} <--> node6.port++;
        ...
}
The above code defines a network type named Network. Note that the NED language uses the familiar curly brace syntax, and “//” to denote comments.
The network contains several nodes, named node1, node2, etc. from the NED module type Node. We'll define Node in the next sections.
The second half of the declaration defines how the nodes are to be connected. The double arrow means bidirectional connection. The connection points of modules are called gates, and the port++ notation adds a new gate to the port[] gate vector. Gates and connections will be covered in more detail in sections [3.7] and [3.9]. Nodes are connected with a channel that has a data rate of 100Mbps.
The above code would be placed into a file named Net6.ned. It is a convention to put every NED definition into its own file and to name the file accordingly, but it is not mandatory to do so.
One can define any number of networks in the NED files, and for every simulation the user has to specify which network to set up. The usual way of specifying the network is to put the network option into the configuration (by default the omnetpp.ini file):
[General]
network = Network
It is cumbersome to have to repeat the data rate for every connection. Luckily, NED provides a convenient solution: one can create a new channel type that encapsulates the data rate setting, and this channel type can be defined inside the network so that it does not litter the global namespace.
The improved network will look like this:
//
// A Network
//
network Network
{
    types:
        channel C extends ned.DatarateChannel {
            datarate = 100Mbps;
        }
    submodules:
        node1: Node;
        node2: Node;
        node3: Node;
        ...
    connections:
        node1.port++ <--> C <--> node2.port++;
        node2.port++ <--> C <--> node4.port++;
        node4.port++ <--> C <--> node6.port++;
        ...
}
Later sections will cover the concepts used (inner types, channels, the DatarateChannel built-in type, inheritance) in detail.
Simple modules are the basic building blocks for other (compound) modules, denoted by the simple keyword. All active behavior in the model is encapsulated in simple modules. Behavior is defined with a C++ class; NED files only declare the externally visible interface of the module (gates, parameters).
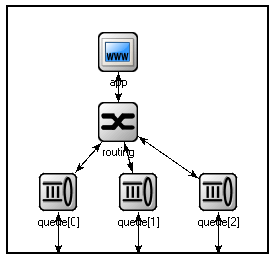
In our example, we could define Node as a simple module. However, its functionality is quite complex (traffic generation, routing, etc), so it is better to implement it with several smaller simple module types which we are going to assemble into a compound module. We'll have one simple module for traffic generation (App), one for routing (Routing), and one for queueing up packets to be sent out (Queue). For brevity, we omit the bodies of the latter two in the code below.
simple App
{
    parameters:
        int destAddress;
        ...
        @display("i=block/browser");
    gates:
        input in;
        output out;
}

simple Routing
{
    ...
}

simple Queue
{
    ...
}
By convention, the above simple module declarations go into the App.ned, Routing.ned and Queue.ned files.
Let us look at the first simple module type declaration. App has a parameter called destAddress (others have been omitted for now), and two gates named out and in for sending and receiving application packets.
The argument of @display() is called a display string, and it defines the rendering of the module in graphical environments; "i=..." defines the default icon.
Generally, @-words like @display are called properties in NED, and they are used to annotate various objects with metadata. Properties can be attached to files, modules, parameters, gates, connections, and other objects, and parameter values have a very flexible syntax.
Now we can assemble App, Routing and Queue into the compound module Node. A compound module can be thought of as a “cardboard box” that groups other modules into a larger unit, which can further be used as a building block for other modules; networks are also a kind of compound module.
module Node
{
    parameters:
        int address;
        @display("i=misc/node_vs,gold");
    gates:
        inout port[];
    submodules:
        app: App;
        routing: Routing;
        queue[sizeof(port)]: Queue;
    connections:
        routing.localOut --> app.in;
        routing.localIn <-- app.out;
        for i=0..sizeof(port)-1 {
            routing.out[i] --> queue[i].in;
            routing.in[i] <-- queue[i].out;
            queue[i].line <--> port[i];
        }
}
Compound modules, like simple modules, may have parameters and gates. Our Node module contains an address parameter, plus a gate vector of unspecified size, named port. The actual gate vector size will be determined implicitly by the number of neighbours when we create a network from nodes of this type. The type of port[] is inout, which allows bidirectional connections.
The modules that make up the compound module are listed under submodules. Our Node compound module type has an app and a routing submodule, plus a queue[] submodule vector that contains one Queue module for each port, as specified by [sizeof(port)]. (It is legal to refer to [sizeof(port)] because the network is built in top-down order, and the node is already created and connected at network level when its submodule structure is built out.)
In the connections section, the submodules are connected to each other and to the parent module. Single arrows are used to connect input and output gates, and double arrows connect inout gates, and a for loop is utilized to connect the routing module to each queue module, and to connect the outgoing/incoming link (line gate) of each queue to the corresponding port of the enclosing module.
We have created the NED definitions for this example, but how are they used by OMNeT++? When the simulation program is started, it loads the NED files. The program should already contain the C++ classes that implement the needed simple modules, App, Routing and Queue; their C++ code is either part of the executable or is loaded from a shared library. The simulation program also loads the configuration (omnetpp.ini), and determines from it that the simulation model to be run is the Network network. Then the network is instantiated for simulation.
The simulation model is built in a top-down preorder fashion. This means that starting from an empty system module, all submodules are created, their parameters and gate vector sizes are assigned, and they are fully connected before the submodule internals are built.
In the following sections we'll go through the elements of the NED language and look at them in more detail.
Simple modules are the active components in the model. Simple modules are defined with the simple keyword.
An example simple module:
simple Queue
{
    parameters:
        int capacity;
        @display("i=block/queue");
    gates:
        input in;
        output out;
}
Both the parameters and gates sections are optional, that is, they can be left out if there is no parameter or gate. In addition, the parameters keyword itself is optional too; it can be left out even if there are parameters or properties.
Note that the NED definition doesn't contain any code to define the operation of the module: that part is expressed in C++. By default, OMNeT++ looks for C++ classes of the same name as the NED type (so here, Queue).
One can explicitly specify the C++ class with the @class property. Classes with namespace qualifiers are also accepted, as shown in the following example that uses the mylib::Queue class:
simple Queue
{
    parameters:
        int capacity;
        @class(mylib::Queue);
        @display("i=block/queue");
    gates:
        input in;
        output out;
}
If there are several modules whose C++ implementation classes are in the same namespace, a better alternative to @class is the @namespace property. The C++ namespace given with @namespace will be prepended to the normal class name. In the following example, the C++ classes will be mylib::App, mylib::Router and mylib::Queue:
@namespace(mylib);

simple App {
   ...
}

simple Router {
   ...
}

simple Queue {
   ...
}
The @namespace property may not only be specified at file level as in the above example, but for packages as well. When placed in a file called package.ned, the namespace will apply to all components in that package and below.
The implementation C++ classes need to be subclassed from the cSimpleModule library class; chapter [4] of this manual describes in detail how to write them.
Simple modules can be extended (or specialized) via subclassing. The motivation for subclassing can be to set some open parameters or gate sizes to a fixed value (see [3.6] and [3.7]), or to replace the C++ class with a different one. Now, by default, the derived NED module type will inherit the C++ class from its base, so it is important to remember that you need to write out @class if you want it to use the new class.
The following example shows how to specialize a module by setting a parameter to a fixed value (and leaving the C++ class unchanged):
simple Queue
{
   int capacity;
   ...
}

simple BoundedQueue extends Queue
{
   capacity = 10;
}
In the next example, the author wrote a PriorityQueue C++ class, and wants to have a corresponding NED type, derived from Queue. However, it does not work as expected:
simple PriorityQueue extends Queue // wrong! still uses the Queue C++ class
{
}
The correct solution is to add a @class property to override the inherited C++ class:
simple PriorityQueue extends Queue
{
   @class(PriorityQueue);
}
Inheritance in general will be discussed in section [3.13].
A compound module groups other modules into a larger unit. A compound
module may have gates and parameters like a simple module, but no active
behavior is associated with it.
A compound module declaration may contain several sections, all of them optional:
module Host
{
   types:
       ...
   parameters:
       ...
   gates:
       ...
   submodules:
       ...
   connections:
       ...
}
Modules contained in a compound module are called submodules, and they are listed in the submodules section. One can create arrays of submodules (i.e. submodule vectors), and the submodule type may come from a parameter.
Connections are listed under the connections section of the declaration. One can create connections using simple programming constructs (loop, conditional). Connection behaviour can be defined by associating a channel with the connection; the channel type may also come from a parameter.
Module and channel types only used locally can be defined in the types section as inner types, so that they do not pollute the namespace.
Compound modules may be extended via subclassing. Inheritance may add new submodules and new connections as well, not only parameters and gates. Also, one may refer to inherited submodules, to inherited types etc. What is not possible is to "de-inherit" or modify submodules or connections.
In the following example, we show how to assemble common protocols
into a "stub" for wireless hosts, and add user agents via
subclassing.
module WirelessHostBase
{
   gates:
       input radioIn;
   submodules:
       tcp: TCP;
       ip: IP;
       wlan: Ieee80211;
   connections:
       tcp.ipOut --> ip.tcpIn;
       tcp.ipIn <-- ip.tcpOut;
       ip.nicOut++ --> wlan.ipIn;
       ip.nicIn++ <-- wlan.ipOut;
       wlan.radioIn <-- radioIn;
}

module WirelessHost extends WirelessHostBase
{
   submodules:
       webAgent: WebAgent;
   connections:
       webAgent.tcpOut --> tcp.appIn++;
       webAgent.tcpIn <-- tcp.appOut++;
}
The WirelessHost compound module can further be extended, for example with an Ethernet port:
module DesktopHost extends WirelessHost
{
   gates:
       inout ethg;
   submodules:
       eth: EthernetNic;
   connections:
       ip.nicOut++ --> eth.ipIn;
       ip.nicIn++ <-- eth.ipOut;
       eth.phy <--> ethg;
}
Channels encapsulate parameters and behaviour associated with connections. Channels are like simple modules, in the sense that there are C++ classes behind them. The rules for finding the C++ class for a NED channel type is the same as with simple modules: the default class name is the NED type name unless there is a @class property (@namespace is also recognized), and the C++ class is inherited when the channel is subclassed.
Thus, the following channel type would expect a CustomChannel C++ class to be present:
channel CustomChannel  // requires a CustomChannel C++ class
{
}
The practical difference compared to modules is that one rarely needs to write custom channel C++ class because there are predefined channel types that one can subclass from, inheriting their C++ code. The predefined types are: ned.IdealChannel, ned.DelayChannel and ned.DatarateChannel. (“ned” is the package name; one can get rid of it by importing the types with the import ned.* directive. Packages and imports are described in section [3.14].)
IdealChannel has no parameters, and lets through all messages without delay or any side effect. A connection without a channel object and a connection with an IdealChannel behave in the same way. Still, IdealChannel has its uses, for example when a channel object is required so that it can carry a new property or parameter that is going to be read by other parts of the simulation model.
DelayChannel has two parameters:
DatarateChannel has a few additional parameters compared to DelayChannel:
The following example shows how to create a new channel type by specializing DatarateChannel:
channel Ethernet100 extends ned.DatarateChannel
{
    datarate = 100Mbps;
    delay = 100us;
    ber = 1e-10;
}
One may add parameters and properties to channels via subclassing, and may modify existing ones. In the following example, we introduce distance-based calculation of the propagation delay:
channel DatarateChannel2 extends ned.DatarateChannel
{
    double distance @unit(m);
    delay = this.distance / 200000km * 1s;
}
Parameters are primarily intended to be read by the underlying C++ class, but new parameters may also be added as annotations to be used by other parts of the model. For example, a cost parameter may be used for routing decisions in routing module, as shown in the example below. The example also shows annotation using properties (@backbone).
channel Backbone extends ned.DatarateChannel
{
    @backbone;
    double cost = default(1);
}
Parameters are variables that belong to a module. Parameters can be used in building the topology (number of nodes, etc), and to supply input to C++ code that implements simple modules and channels.
Parameters can be of type double, int, bool, string and xml; they can also be declared volatile. For the numeric types, a unit of measurement can also be specified (@unit property), to increase type safety.
Parameters can get their value from NED files or from the configuration (omnetpp.ini). A default value can also be given (default(...)), which is used if the parameter is not assigned otherwise.
The following example shows a simple module that has five parameters, three of which have default values:
simple App
{
    parameters:
        string protocol;       // protocol to use: "UDP" / "IP" / "ICMP" / ...
        int destAddress;       // destination address
        volatile double sendInterval @unit(s) = default(exponential(1s));
                               // time between generating packets
        volatile int packetLength @unit(byte) = default(100B);
                               // length of one packet
        volatile int timeToLive = default(32);
                               // maximum number of network hops to survive
    gates:
        input in;
        output out;
}
Parameters may get their values in several ways: from NED code, from the configuration (omnetpp.ini), or even, interactively from the user. NED lets one assign parameters at several places: in subclasses via inheritance; in submodule and connection definitions where the NED type is instantiated; and in networks and compound modules that directly or indirectly contain the corresponding submodule or connection.
For instance, one could specialize the above App module type via inheritance with the following definition:
simple PingApp extends App
{
    parameters:
        protocol = "ICMP/ECHO"
        sendInterval = default(1s);
        packetLength = default(64byte);
}
This definition sets the protocol parameter to a fixed value ("ICMP/ECHO"), and changes the default values of the sendInterval and packetLength parameters. protocol is now locked down in PingApp, its value cannot be modified via further subclassing or other ways. sendInterval and packetLength are still unassigned here, only their default values have been overwritten.
Now, let us see the definition of a Host compound module that uses PingApp as submodule:
module Host
{
    submodules:
        ping : PingApp {
            packetLength = 128B; // always ping with 128-byte packets
        }
        ...
}
This definition sets the packetLength parameter to a fixed value. It is now hardcoded that Hosts send 128-byte ping packets; this setting cannot be changed from NED or the configuration.
It is not only possible to set a parameter from the compound module that contains the submodule, but also from modules higher up in the module tree. A network that employs several Host modules could be defined like this:
network Network
{
    submodules:
        host[100]: Host {
            ping.timeToLive = default(3);
            ping.destAddress = default(0);
        }
        ...
}
Parameter assignment can also be placed into the parameters block of the parent compound module, which provides additional flexibility. The following definition sets up the hosts so that half of them pings host #50, and the other half pings host #0:
network Network
{
    parameters:
        host[*].ping.timeToLive = default(3);
        host[0..49].ping.destAddress = default(50);
        host[50..].ping.destAddress = default(0);

    submodules:
        host[100]: Host;
        ...
}
Note the use of asterisk to match any index, and .. to match index ranges.
If there were a number of individual hosts instead of a submodule vector, the network definition could look like this:
network Network
{
    parameters:
        host*.ping.timeToLive = default(3);
        host{0..49}.ping.destAddress = default(50);
        host{50..}.ping.destAddress = default(0);

    submodules:
        host0: Host;
        host1: Host;
        host2: Host;
        ...
        host99: Host;
}
An asterisk matches any substring not containing a dot, and a .. within a pair of curly braces matches a natural number embedded in a string.
In most assigments we have seen above, the left hand side of the equal sign contained a dot and often a wildcard as well (asterisk or numeric range); we call these assignments pattern assignments or deep assignments.
There is one more wildcard that can be used in pattern assignments, and this is the double asterisk; it matches any sequence of characters including dots, so it can match multiple path elements. An example:
network Network
{
    parameters:
        **.timeToLive = default(3);
        **.destAddress = default(0);
    submodules:
        host0: Host;
        host1: Host;
        ...
}
Note that some assignments in the above examples changed default values, while others set parameters to fixed values. Parameters that received no fixed value in the NED files can be assigned from the configuration (omnetpp.ini).
A parameter can be assigned in the configuration using a similar syntax as NED pattern assignments (actually, it would be more historically accurate to say it the other way round, that NED pattern assignments use a similar syntax to ini files):
Network.host[*].ping.sendInterval = 500ms  # for the host[100] example
Network.host*.ping.sendInterval = 500ms    # for the host0,host1,... example
**.sendInterval = 500ms
One often uses the double asterisk to save typing. One can write
**.ping.sendInterval = 500ms
Or if one is certain that only ping modules have sendInterval parameters, the following will suffice:
**.sendInterval = 500ms
Parameter assignments in the configuration are described in section [10.3].
One can also write expressions, including stochastic expressions, in NED files and in ini files as well. For example, here's how one can add jitter to the sending of ping packets:
**.sendInterval = 1s + normal(0s, 0.001s) # or just: normal(1s, 0.001s)
If there is no assignment for a parameter in NED or in the ini file, the default value (given with =default(...) in NED) will be applied implicitly. If there is no default value, the user will be asked, provided the simulation program is allowed to do that; otherwise there will be an error. (Interactive mode is typically disabled for batch executions where it would do more harm than good.)
It is also possible to explicitly apply the default (this can sometimes be useful):
**.sendInterval = default
Finally, one can explicitly ask the simulator to prompt the user interactively for the value (again, provided that interactivity is enabled; otherwise this will result in an error):
**.sendInterval = ask
Parameter values may be given with expressions. NED language expressions have a C-like syntax, with some variations on operator names: binary and logical XOR are # and ##, while ^ has been reassigned to power-of instead. The + operator does string concatenation as well as numeric addition. Expressions can use various numeric, string, stochastic and other functions (fabs(), toUpper(), uniform(), erlang_k(), etc.).
Expressions may refer to module parameters, gate vector and module vector sizes (using the sizeof operator) and the index of the current module in a submodule vector (index).
Expressions may refer to parameters of the compound module being defined, of the current module (with the this. prefix), and to parameters of already defined submodules, with the syntax submodule.parametername (or submodule[index].parametername).
The volatile modifier causes the parameter's value expression to be evaluated every time the parameter is read. This has significance if the expression is not constant, for example it involves numbers drawn from a random number generator. In contrast, non-volatile parameters are evaluated only once. (This practically means that they are evaluated and replaced with the resulting constant at the start of the simulation.)
To better understand volatile, let's suppose we have a Queue simple module that has a volatile double parameter named serviceTime.
simple Queue
{
    parameters:
        volatile double serviceTime;
}
Because of the volatile modifier, the queue module's C++ implementation is expected to re-read the serviceTime parameter whenever a value is needed; that is, for every job serviced. Thus, if serviceTime is assigned an expression like uniform(0.5s, 1.5s), every job will have a different, random service time. To highlight this effect, here's how one can have a time-varying parameter by exploiting the simTime() NED function that returns the current simulation time:
**.serviceTime = simTime()<1000s ? 1s : 2s # queue that slows down after 1000s
In practice, a volatile parameters are typically used as a configurable source of random numbers for modules.
One can declare a parameter to have an associated unit of measurement, by adding the @unit property. An example:
simple App
{
    parameters:
        volatile double sendInterval @unit(s) = default(exponential(350ms));
        volatile int packetLength @unit(byte) = default(4KiB);
    ...
}
The @unit(s) and @unit(byte) declarations specify the measurement unit for the parameter. Values assigned to parameters must have the same or compatible unit, i.e. @unit(s) accepts milliseconds, nanoseconds, minutes, hours, etc., and @unit(byte) accepts kilobytes, megabytes, etc. as well.
The OMNeT++ runtime does a full and rigorous unit check on parameters to ensure “unit safety” of models. Constants should always include the measurement unit.
The @unit property of a parameter cannot be added or overridden in subclasses or in submodule declarations.
Sometimes modules need complex data structures as input, which is something that cannot be done well with module parameters. One solution is to place the input data into a custom configuration file, pass the file name to the module in a string parameter, and let the module read and parse the file.
It is somewhat easier if the configuration uses XML syntax, because OMNeT++ contains built-in support for XML files. Using an XML parser (LibXML2 or Expat), OMNeT++ reads and DTD-validates the file (if the XML document contains a DOCTYPE), caches the file (so that references to it from several modules will result in the file being loaded only once), allows selection of parts of the document using an XPath-subset notation, and presents the contents in a DOM-like object tree.
This capability can be accessed via the NED parameter type xml, and the xmldoc() function. One can point xml-type module parameters to a specific XML file (or to an element inside an XML file) via the xmldoc() function. One can assign xml parameters both from NED and from omnetpp.ini.
The following example declares an xml parameter, and assigns an XML file to it. The file name is understood as being relative to the working directory.
simple TrafGen {
    parameters:
        xml profile;
    gates:
        output out;
}

module Node {
    submodules:
        trafGen1 : TrafGen {
            profile = xmldoc("data.xml");
        }
        ...
}
xmldoc() also lets one select an element within an XML file. In case one has a model that contains numerous modules that need XML input, this feature allows the user get rid of the countless small XML files by aggregating them into a single XML file. For example, the following XML file contains two profiles identified with the IDs gen1 and gen2:
<?xml>
<root>
    <profile id="gen1">
          <param>3</param>
          <param>5</param>
    </profile>
    <profile id="gen2">
          <param>9</param>
    </profile>
</root>
And one can assign each profile to a corresponding submodule using an XPath-like expression:
module Node {
    submodules:
        trafGen1 : TrafGen {
            profile = xmldoc("all.xml", "/root/profile[@id='gen1']");
        }
        trafGen2 : TrafGen {
            profile = xmldoc("all.xml", "/root/profile[@id='gen2']");
        }
}
It is also possible to create an XML document from a string constant, using the xml() function. This is especially useful for creating a default value for xml parameters. An example:
simple TrafGen {
    parameters:
        xml profile = xml("<root/>"); // empty document as default
        ...
}
The xml() function, like xmldoc(), also supports an optional second XPath parameter for selecting a subtree.
Gates are the connection points of modules. OMNeT++ has three types of gates: input, output and inout, the latter being essentially an input and an output gate glued together.
A gate, whether input or output, can only be connected to one other gate. (For compound module gates, this means one connection “outside” and one “inside”.) It is possible, though generally not recommended, to connect the input and output sides of an inout gate separately (see section [3.9]).
One can create single gates and gate vectors. The size of a gate vector can be given inside square brackets in the declaration, but it is also possible to leave it open by just writing a pair of empty brackets (“[]”).
When the gate vector size is left open, one can still specify it later, when subclassing the module, or when using the module for a submodule in a compound module. However, it does not need to be specified because one can create connections with the gate++ operator that automatically expands the gate vector.
The gate size can be queried from various NED expressions with the sizeof() operator.
NED normally requires that all gates be connected. To relax this requirement, one can annotate selected gates with the @loose property, which turns off the connectivity check for that gate. Also, input gates that solely exist so that the module can receive messages via sendDirect() (see [4.7.5]) should be annotated with @directIn. It is also possible to turn off the connectivity check for all gates within a compound module by specifying the allowunconnected keyword in the module's connections section.
Let us see some examples.
In the following example, the Classifier module has one input for receiving jobs, which it will send to one of the outputs. The number of outputs is determined by a module parameter:
simple Classifier {
    parameters:
        int numCategories;
    gates:
        input in;
        output out[numCategories];
}
The following Sink module also has its in[] gate defined as a vector, so that it can be connected to several modules:
simple Sink {
    gates:
        input in[];
}
The following lines define a node for building a square grid. Gates around the edges of the grid are expected to remain unconnected, hence the @loose annotation:
simple GridNode {
    gates:
        inout neighbour[4] @loose;
}
WirelessNode below is expected to receive messages (radio transmissions) via direct sending, so its radioIn gate is marked with @directIn.
simple WirelessNode {
    gates:
        input radioIn @directIn;
}
In the following example, we define TreeNode as having gates to connect any number of children, then subclass it to get a BinaryTreeNode to set the gate size to two:
simple TreeNode {
    gates:
        inout parent;
        inout children[];
}

simple BinaryTreeNode extends TreeNode {
    gates:
        children[2];
}
An example for setting the gate vector size in a submodule, using the same TreeNode module type as above:
module BinaryTree {
    submodules:
        nodes[31]: TreeNode {
            gates:
                children[2];
        }
    connections:
        ...
}
Modules that a compound module is composed of are called its submodules. A submodule has a name, and it is an instance of a compound or simple module type. In the NED definition of a submodule, this module type is usually given statically, but it is also possible to specify the type with a string expression. (The latter feature, parametric submodule types, will be discussed in section [3.11.1].)
NED supports submodule arrays (vectors) and conditional submodules as well. Submodule vector size, unlike gate vector size, must always be specified and cannot be left open as with gates.
It is possible to add new submodules to an existing compound module via subclassing; this has been described in the section [3.4].
The basic syntax of submodules is shown below:
module Node
{
    submodules:
        routing: Routing;   // a submodule
        queue[sizeof(port)]: Queue;  // submodule vector
        ...
}
As already seen in previous code examples, a submodule may also have a curly brace block as body, where one can assign parameters, set the size of gate vectors, and add/modify properties like the display string (@display). It is not possible to add new parameters and gates.
Display strings specified here will be merged with the display string from the type to get the effective display string. The merge algorithm is described in chapter [8].
module Node
{
    gates:
        inout port[];
    submodules:
        routing: Routing {
            parameters:   // this keyword is optional
                routingTable = "routingtable.txt"; // assign parameter
            gates:
                in[sizeof(port)];  // set gate vector size
                out[sizeof(port)];
        }
        queue[sizeof(port)]: Queue {
            @display("t=queue id $id"); // modify display string
            id = 1000+index;  // use submodule index to generate different IDs
        }
    connections:
        ...
}
An empty body may be omitted, that is,
queue: Queue;
is the same as
      queue: Queue {
      }
A submodule or submodule vector can be conditional. The if keyword and the condition itself goes after the submodule type, like in the example below:
module Host
{
    parameters:
        bool withTCP = default(true);
    submodules:
        tcp : TCP if withTCP;
        ...
}
Note that with submodule vectors, setting zero vector size can be used as an alternative to the if condition.
Connections are defined in the connections section of compound modules. Connections cannot span across hierarchy levels; one can connect two submodule gates, a submodule gate and the "inside" of the parent (compound) module's gates, or two gates of the parent module (though this is rarely useful), but it is not possible to connect to any gate outside the parent module, or inside compound submodules.
Input and output gates are connected with a normal arrow, and inout gates with a double-headed arrow “<-->”. To connect the two gates with a channel, use two arrows and put the channel specification in between. The same syntax is used to add properties such as @display to the connection.
Some examples have already been shown in the NED Quickstart section ([3.2]); let's see some more.
It has been mentioned that an inout gate is basically an input and an output gate glued together. These sub-gates can also be addressed (and connected) individually if needed, as port$i and port$o (or for vector gates, as port$i[$k$] and port$o[k]).
Gates are specified as modulespec.gatespec (to connect a submodule), or as gatespec (to connect the compound module). modulespec is either a submodule name (for scalar submodules), or a submodule name plus an index in square brackets (for submodule vectors). For scalar gates, gatespec is the gate name; for gate vectors it is either the gate name plus an index in square brackets, or gatename++.
The gatename++ notation causes the first unconnected gate index to be used. If all gates of the given gate vector are connected, the behavior is different for submodules and for the enclosing compound module. For submodules, the gate vector expands by one. For a compound module, after the last gate is connected, ++ will stop with an error.
When the ++ operator is used with $i or $o (e.g. g$i++ or g$o++, see later), it will actually add a gate pair (input+output) to maintain equal gate sizes for the two directions.
Channel specifications (-->channelspec--> inside a connection) are similar to submodules in many respect. Let's see some examples!
The following connections use two user-defined channel types, Ethernet100 and Backbone. The code shows the syntax for assigning parameters (cost and length) and specifying a display string (and NED properties in general):
a.g++ <--> Ethernet100 <--> b.g++;
a.g++ <--> Backbone {cost=100; length=52km; ber=1e-8;} <--> b.g++;
a.g++ <--> Backbone {@display("ls=green,2");} <--> b.g++;
When using built-in channel types, the type name can be omitted; it will be inferred from the parameter names.
a.g++ <--> {delay=10ms;} <--> b.g++;
a.g++ <--> {delay=10ms; ber=1e-8;} <--> b.g++;
a.g++ <--> {@display("ls=red");} <--> b.g++;
If datarate, ber or per is assigned, ned.DatarateChannel will be chosen. Otherwise, if delay or disabled is present, it will be ned.DelayChannel; otherwise it is ned.IdealChannel. Naturally, if other parameter names are assigned in a connection without an explicit channel type, it will be an error (with “ned.DelayChannel has no such parameter” or similar message).
Connection parameters, similarly to submodule parameters, can also be assigned using pattern assignments, albeit the channel names to be matched with patterns are a little more complicated and less convenient to use. A channel can be identified with the name of its source gate plus the channel name; the channel name is currently always channel. It is illustrated by the following example:
module Queueing
{
    parameters:
        source.out.channel.delay = 10ms;
        queue.out.channel.delay = 20ms;
    submodules:
        source: Source;
        queue: Queue;
        sink: Sink;
    connections:
        source.out --> ned.DelayChannel --> queue.in;
        queue.out --> ned.DelayChannel <--> sink.in;
Using bidirectional connections is a bit trickier, because both directions must be covered separately:
network Network
{
    parameters:
        hostA.g$o[0].channel.datarate = 100Mbps; // the A -> B connection
        hostB.g$o[0].channel.datarate = 100Mbps; // the B -> A connection
        hostA.g$o[1].channel.datarate = 1Gbps;   // the A -> C connection
        hostC.g$o[0].channel.datarate = 1Gbps;   // the C -> A connection
    submodules:
        hostA: Host;
        hostB: Host;
        hostC: Host;
    connections:
        hostA.g++ <--> ned.DatarateChannel <--> hostB.g++;
        hostA.g++ <--> ned.DatarateChannel <--> hostC.g++;
Also, with the ++ syntax it is not always easy to figure out which gate indices map to the connections one needs to configure. If connection objects could be given names to override the default name “channel”, that would make it easier to identify connections in patterns. This feature is described in the next section.
The default name given to channel objects is "channel". Since OMNeT++ 4.3 it is possible to specify the name explicitly, and also to override the default name per channel type. The purpose of custom channel names is to make addressing easier when channel parameters are assigned from ini files.
The syntax for naming a channel in a connection is similar to submodule syntax: name: type. Since both name and type are optional, the colon must be there after name even if type is missing, in order to remove the ambiguity.
Examples:
r1.pppg++ <--> eth1: EthernetChannel <--> r2.pppg++;
a.out --> foo: {delay=1ms;} --> b.in;
a.out --> bar: --> b.in;
In the absence of an explicit name, the channel name comes from the @defaultname property of the channel type if that exists.
channel Eth10G extends ned.DatarateChannel like IEth {
    @defaultname(eth10G);
}
There's a catch with @defaultname though: if the channel type is specified with a **.channelname.liketype= line in an ini file, then the channel type's @defaultname cannot be used as channelname in that configuration line, because the channel type would only be known as a result of using that very configuration line. To illustrate the problem, consider the above Eth10G channel, and a compound module containing the following connection:
r1.pppg++ <--> <> like IEth <--> r2.pppg++;
Then consider the following inifile:
**.eth10G.typename = "Eth10G"   # Won't match! The eth10G name would come from
                                #   the Eth10G type - catch-22!
**.channel.typename = "Eth10G"  # OK, as lookup assumes the name "channel"
**.eth10G.datarate = 10.01Gbps  # OK, channel already exists with name "eth10G"
The anomaly can be avoided by using an explicit channel name in the connection, not using @defaultname, or by specifying the type via a module parameter (e.g. writing <param> like ... instead of <> like ...).
Simple programming constructs (loop, conditional) allow creating multiple connections easily.
This will be shown in the following examples.
One can create a chain of modules like this:
module Chain
    parameters:
        int count;
    submodules:
        node[count] : Node {
            gates:
                port[2];
        }
    connections allowunconnected:
        for i = 0..count-2 {
            node[i].port[1] <--> node[i+1].port[0];
        }
}
One can build a binary tree in the following way:
simple BinaryTreeNode {
    gates:
        inout left;
        inout right;
        inout parent;
}

module BinaryTree {
    parameters:
        int height;
    submodules:
        node[2^height-1]: BinaryTreeNode;
    connections allowunconnected:
        for i=0..2^(height-1)-2 {
            node[i].left <--> node[2*i+1].parent;
            node[i].right <--> node[2*i+2].parent;
        }
}
Note that not every gate of the modules will be connected. By default, an unconnected gate produces a run-time error message when the simulation is started, but this error message is turned off here with the allowunconnected modifier. Consequently, it is the simple modules' responsibility not to send on an unconnected gate.
Conditional connections can be used to generate random topologies, for example. The following code generates a random subgraph of a full graph:
module RandomGraph {
    parameters:
        int count;
        double connectedness; // 0.0<x<1.0
    submodules:
        node[count]: Node {
            gates:
                in[count];
                out[count];
        }
    connections allowunconnected:
        for i=0..count-1, for j=0..count-1 {
            node[i].out[j] --> node[j].in[i]
                if i!=j && uniform(0,1)<connectedness;
        }
}
Note the use of the allowunconnected modifier here too, to turn off error messages produced by the network setup code for unconnected gates.
Several approaches can be used for creating complex topologies that have a regular structure; three of them are described below.
This pattern takes a subset of the connections of a full graph. A condition is used to “carve out” the necessary interconnection from the full graph:
for i=0..N-1, for j=0..N-1 {
    node[i].out[...] --> node[j].in[...] if condition(i,j);
}
The RandomGraph compound module (presented earlier) is an example of this pattern, but the pattern can generate any graph where an appropriate condition(i,j) can be formulated. For example, when generating a tree structure, the condition would return whether node j is a child of node i or vice versa.
Though this pattern is very general, its usage can be prohibitive if the number of nodes N is high and the graph is sparse (it has much less than N2 connections). The following two patterns do not suffer from this drawback.
The pattern loops through all nodes and creates the necessary connections for each one. It can be generalized like this:
for i=0..Nnodes, for j=0..Nconns(i)-1 {
    node[i].out[j] --> node[rightNodeIndex(i,j)].in[j];
}
The Hypercube compound module (to be presented later) is a clear example of this approach. BinaryTree can also be regarded as an example of this pattern where the inner j loop is unrolled.
The applicability of this pattern depends on how easily the rightNodeIndex(i,j) function can be formulated.
A third pattern is to list all connections within a loop:
for i=0..Nconnections-1 {
    node[leftNodeIndex(i)].out[...] --> node[rightNodeIndex(i)].in[...];
}
This pattern can be used if leftNodeIndex(i) and rightNodeIndex(i) mapping functions can be sufficiently formulated.
The Chain module is an example of this approach where the mapping functions are extremely simple: leftNodeIndex(i)=i and rightNodeIndex(i) = i+1. The pattern can also be used to create a random subset of a full graph with a fixed number of connections.
In the case of irregular structures where none of the above patterns can be employed, one can resort to listing all connections, like one would do it in most existing simulators.
A submodule type may be specified with a module parameter of the type string, or in general, with any string-typed expression. The syntax uses the like keyword.
Let us begin with an example:
network Net6
{
    parameters:
        string nodeType;
    submodules:
        node[6]: <nodeType> like INode {
            address = index;
        }
    connections:
        ...
}
It creates a submodule vector whose module type will come from the nodeType parameter. For example, if nodeType is set to "SensorNode", then the module vector will consist of sensor nodes, provided such module type exists and it qualifies. What this means is that the INode must be an existing module interface, which the SensorNode module type must implement (more about this later).
As already mentioned, one can write an expression between the angle brackets. The expression may use the parameters of the parent module and of previously defined submodules, and has to yield a string value. For example, the following code is also valid:
network Net6
{
    parameters:
        string nodeTypePrefix;
        int variant;
    submodules:
        node[6]: <nodeTypePrefix + "Node" + string(variant)> like INode {
           ...
}
The corresponding NED declarations:
moduleinterface INode
{
    parameters:
        int address;
    gates:
        inout port[];
}

module SensorNode like INode
{
    parameters:
        int address;
        ...
    gates:
        inout port[];
        ...
}
The “<nodeType> like INode” syntax has an issue when used with submodule vectors: does not allow one to specify different types for different indices. The following syntax is better suited for submodule vectors:
The expression between the angle brackets may be left out altogether, leaving a pair of empty angle brackets, <>:
module Node
{
    submodules:
        nic: <> like INic;  // type name expression left unspecified
        ...
}
Now the submodule type name is expected to be defined via typename pattern assignments. Typename pattern assignments look like pattern assignments for the submodule's parameters, only the parameter name is replaced by the typename keyword. Typename pattern assignments may also be written in the configuration file. In a network that uses the above Node NED type, typename pattern assignments would look like this:
network Network
{
    parameters:
        node[*].nic.typename = "Ieee80211g";
    submodules:
        node: Node[100];
}
A default value may also be specified between the angle brackets; it will be used if there is no typename assignment for the module:
module Node
{
    submodules:
        nic: <default("Ieee80211b")> like INic;
        ...
}
There must be exactly one module type that goes by the simple name Ieee80211b and also implements the module interface INic, otherwise an error message will be issued. (The imports in Node's the NED file play no role in the type resolution.) If there are two or more such types, one can remove the ambiguity by specifying the fully qualified module type name, i.e. one that also includes the package name:
module Node
{
    submodules:
        nic: <default("acme.wireless.Ieee80211b")> like INic; // made-up name
        ...
}
When creating reusable compound modules, it is often useful to be able to make a parametric submodule also optional. One solution is to let the user define the submodule type with a string parameter, and not create the module when the parameter is set to the empty string. Like this:
module Node
{
    parameters:
        string tcpType = default("Tcp");
    submodules:
        tcp: <tcpType> like ITcp if tcpType!="";
}
However, this pattern, when used extensively, can lead to a large number of string parameters. Luckily, it is also possible to achieve the same effect with typename, without using extra parameters:
module Node
{
    submodules:
        tcp: <default("Tcp")> like ITcp if typename!="";
}
The typename operator in a submodule's if condition evaluates to the would-be type of the submodule. By using the typename!="" condition, we can let the user eliminate the tcp submodule by setting its typename to the empty string. For example, in a network that uses the above NED type, typename pattern assignments could look like this:
network Network
{
    parameters:
        node1.tcp.typename = "TcpExt"; // let node1 use a custom TCP
        node2.tcp.typename = ""; // no TCP in node2
    submodules:
        node1: Node;
        node2: Node;
}
Note that this trick does not work with submodule vectors. The reason is that the condition applies to the vector as a whole, while type is per-element.
It is often also useful to be able to check, e.g. in the connections section, whether a conditional submodule has been created or not. This can be done with the exists() operator. An example:
module Node
{
        ...
    connections:
        ip.tcpOut --> tcp.ipIn if exists(ip) && exists(tcp);
}
Limitation: exists() may only be used after the submodule's occurrence in the compound module.
Parametric connection types work similarly to parametric submodule types, and the syntax is similar as well. A basic example that uses a parameter of the parent module:
a.g++ <--> <channelType> like IMyChannel <--> b.g++;
a.g++ <--> <channelType> like IMyChannel {@display("ls=red");} <--> b.g++;
The expression may use loop variables, parameters of the parent module and also parameters of submodules (e.g. host[2].channelType).
The type expression may also be absent, and then the type is expected to be specified using typename pattern assignments:
a.g++ <--> <> like IMyChannel <--> b.g++;
a.g++ <--> <> like IMyChannel {@display("ls=red");} <--> b.g++;
A default value may also be given:
a.g++ <--> <default("Ethernet100")> like IMyChannel <--> b.g++;
a.g++ <--> <default(channelType)> like IMyChannel <--> b.g++;
The corresponding type pattern assignments:
a.g$o[0].channel.typename = "Ethernet1000";  // A -> B channel
b.g$o[0].channel.typename = "Ethernet1000";  // B -> A channel
NED properties are metadata annotations that can be added to modules, parameters, gates, connections, NED files, packages, and virtually anything in NED. @display, @class, @namespace, @unit, @prompt, @loose, @directIn are all properties that have been mentioned in previous sections, but those examples only scratch the surface of what properties are used for.
Using properties, one can attach extra information to NED elements. Some properties are interpreted by NED, by the simulation kernel; other properties may be read and used from within the simulation model, or provide hints for NED editing tools.
Properties are attached to the type, so one cannot have different properties defined per-instance. All instances of modules, connections, parameters, etc. created from any particular location in the NED files have identical properties.
The following example shows the syntax for annotating various NED elements:
@namespace(foo);  // file property

module Example
{
    parameters:
       @node;   // module property
       @display("i=device/pc");   // module property
       int a @unit(s) = default(1); // parameter property
    gates:
       output out @loose @labels(pk);  // gate properties
    submodules:
       src: Source {
           parameters:
              @display("p=150,100");  // submodule property
              count @prompt("Enter count:"); // adding a property to a parameter
           gates:
              out[] @loose;  // adding a property to a gate
       }
       ...
    connections:
       src.out++ --> { @display("ls=green,2"); } --> sink1.in; // connection prop.
       src.out++ --> Channel { @display("ls=green,2"); } --> sink2.in;
}
Sometimes it is useful to have multiple properties with the same name, for example for declaring multiple statistics produced by a simple module. Property indices make this possible.
A property index is an identifier or a number in square brackets after the property name, such as eed and jitter in the following example:
simple App {
    @statistic[eed](title="end-to-end delay of received packets";unit=s);
    @statistic[jitter](title="jitter of received packets");
}
This example declares two statistics as @statistic properties, @statistic[eed] and @statistic[jitter]. Property values within the parentheses are used to supply additional info, like a more descriptive name (title="..." or a unit (unit=s). Property indices can be conveniently accessed from the C++ API as well; for example it is possible to ask what indices exist for the "statistic" property, and it will return a list containing "eed" and "jitter").
In the @statistic example the index was textual and meaningful, but neither is actually required. The following dummy example shows the use of numeric indices which may be ignored altogether by the code that interprets the properties:
simple Dummy {
    @foo[1](what="apples";amount=2);
    @foo[2](what="oranges";amount=5);
}
Note that without the index, the lines would actually define the same @foo property, and would overwrite each other's values.
Indices also make it possible to override entries via inheritance:
simple DummyExt extends Dummy {
    @foo[2](what="grapefruits"); // 5 grapefruits instead of 5 oranges
}
Properties may contain data, given in parentheses; the data model is quite flexible. To begin with, properties may contain no value or a single value:
@node;
@node(); // same as @node
@class(FtpApp2);
Properties may contain lists:
@foo(Sneezy,Sleepy,Dopey,Doc,Happy,Bashful,Grumpy);
They may contain key-value pairs, separated by semicolons:
@foo(x=10.31; y=30.2; unit=km);
In key-value pairs, each value can be a (comma-separated) list:
@foo(coords=47.549,19.034;labels=vehicle,router,critical);
The above examples are special cases of the general data model. According to the data model, properties contain key-valuelist pairs, separated by semicolons. Items in valuelist are separated by commas. Wherever key is missing, values go on the valuelist of the default key, the empty string.
Value items may contain words, numbers, string constants and some other characters, but not arbitrary strings. Whenever the syntax does not permit some value, it should be enclosed in quotes. This quoting does not affect the value because the parser automatically drops one layer of quotes; thus, @class(TCP) and @class("TCP") are exactly the same. If the quotes themselves need to be part of the value, an extra layer of quotes and escaping are the solution: @foo("\"some string\"").
There are also some conventions. One can use properties to tag NED elements; for example, a @host property could be used to mark all module types that represent various hosts. This property could be recognized e.g. by editing tools, by topology discovery code inside the simulation model, etc.
The convention for such a “marker” property is that any extra data in it (i.e. within parens) is ignored, except a single word false, which has the special meaning of “turning off” the property. Thus, any simulation model or tool that interprets properties should handle all the following forms as equivalent to @host: @host(), @host(true), @host(anything-but-false), @host(a=1;b=2); and @host(false) should be interpreted as the lack of the @host tag.
Properties defined on a module or channel type may be updated both by subclassing and when using type as a submodule or connection channel. One can add new properties, and also modify existing ones.
When modifying a property, the new property is merged with the old one. The rules of merging are fairly simple. New keys simply get added. If a key already exists in the old property, items in its valuelist overwrite items on the same position in the old property. A single hyphen ($-$) as valuelist item serves as “antivalue”, it removes the item at the corresponding position.
Some examples:
| base | @prop |
| new | @prop(a) |
| result | @prop(a) |
| base | @prop(a,b,c) |
| new | @prop(,-) |
| result | @prop(a,,c) |
| base | @prop(foo=a,b) |
| new | @prop(foo=A,,c;bar=1,2) |
| result | @prop(foo=A,b,c;bar=1,2) |
Inheritance support in the NED language is only described briefly here, because several details and examples have been already presented in previous sections.
In NED, a type may only extend (extends keyword) an element of the same component type: a simple module may extend a simple module, a channel may extend a channel, a module interface may extend a module interface, and so on. There is one irregularity, however: A compound module may extend a simple module (and inherits its C++ class), but not vica versa.
Single inheritance is supported for modules and channels, and multiple inheritance is supported for module interfaces and channel interfaces. A network is a shorthand for a compound module with the @isNetwork property set, so the same rules apply to it as to compound modules.
However, a simple or compound module type may implement (like keyword) several module interfaces; likewise, a channel type may implement several channel interfaces.
Inheritance may:
For details and examples, see the corresponding sections of this chapter (simple modules [3.3], compound modules [3.4], channels [3.5], parameters [3.6], gates [3.7], submodules [3.8], connections [3.9], module interfaces and channel interfaces [3.11.1]).
Having all NED files in a single directory is fine for small simulation projects. When a project grows, however, it sooner or later becomes necessary to introduce a directory structure, and sort the NED files into them. NED natively supports directory trees with NED files, and calls directories packages. Packages are also useful for reducing name conflicts, because names can be qualified with the package name.
When a simulation is run, one must tell the simulation kernel the directory which is the root of the package tree; let's call it NED source folder. The simulation kernel will traverse the whole directory tree, and load all NED files from every directory. One can have several NED directory trees, and their roots (the NED source folders) should be given to the simulation kernel in the NED path variable. The NED path can be specified in several ways: as an environment variable (NEDPATH), as a configuration option (ned-path), or as a command-line option to the simulation runtime (-n). NEDPATH is described in detail in chapter [11].
Directories in a NED source tree correspond to packages. If NED files are in the <root>/a/b/c directory (where <root> is listed in NED path), then the package name is a.b.c. The package name has to be explicitly declared at the top of the NED files as well, like this:
package a.b.c;
The package name that follows from the directory name and the declared package must match; it is an error if they don't. (The only exception is the root package.ned file, as described below.)
By convention, package names are all lowercase, and begin with either the project name (myproject), or the reversed domain name plus the project name (org.example.myproject). The latter convention would cause the directory tree to begin with a few levels of empty directories, but this can be eliminated with a toplevel package.ned.
NED files called package.ned have a special role, as they are meant to represent the whole package. For example, comments in package.ned are treated as documentation of the package. Also, a @namespace property in a package.ned file affects all NED files in that directory and all directories below.
The toplevel package.ned file can be used to designate the root package, which is useful for eliminating a few levels of empty directories resulting from the package naming convention. For example, given a project where all NED types are under the org.acme.foosim package, one can eliminate the empty directory levels org, acme and foosim by creating a package.ned file in the source root directory with the package declaration org.example.myproject. This will cause a directory foo under the root to be interpreted as package org.example.myproject.foo, and NED files in them must contain that as package declaration. Only the root package.ned can define the package, package.ned files in subdirectories must follow it.
Let's look at the INET Framework as example, which contains hundreds of NED files in several dozen packages. The directory structure looks like this:
INET/
    src/
        base/
        transport/
            tcp/
            udp/
            ...
        networklayer/
        linklayer/
        ...
    examples/
        adhoc/
        ethernet/
        ...
The src and examples subdirectories are denoted as NED source folders, so NEDPATH is the following (provided INET was unpacked in /home/joe):
/home/joe/INET/src;/home/joe/INET/examples
Both src and examples contain package.ned files to define the root package:
// INET/src/package.ned:
package inet;
// INET/examples/package.ned:
package inet.examples;
And other NED files follow the package defined in package.ned:
// INET/src/transport/tcp/TCP.ned:
package inet.transport.tcp;
We already mentioned that packages can be used to distinguish similarly named NED types. The name that includes the package name (a.b.c.Queue for a Queue module in the a.b.c package) is called fully qualified name; without the package name (Queue) it is called simple name.
Simple names alone are not enough to unambiguously identify a type. Here is how one can refer to an existing type:
Types can be imported with the import keyword by either fully qualified name, or by a wildcard pattern. In wildcard patterns, one asterisk ("*") stands for "any character sequence not containing period", and two asterisks ("**") mean "any character sequence which may contain period".
So, any of the following lines can be used to import a type called inet.protocols.networklayer.ip.RoutingTable:
import inet.protocols.networklayer.ip.RoutingTable;
import inet.protocols.networklayer.ip.*;
import inet.protocols.networklayer.ip.Ro*Ta*;
import inet.protocols.*.ip.*;
import inet.**.RoutingTable;
If an import explicitly names a type with its exact fully qualified name, then that type must exist, otherwise it is an error. Imports containing wildcards are more permissive, it is allowed for them not to match any existing NED type (although that might generate a warning.)
Inner types may not be referred to outside their enclosing types, so they cannot be imported either.
The situation is a little different for submodule and connection channel specifications using the like keyword, when the type name comes from a string-valued expression (see section [3.11.1] about submodule and channel types as parameters). Imports are not much use here: at the time of writing the NED file it is not yet known what NED types will be suitable for being "plugged in" there, so they cannot be imported in advance.
There is no problem with fully qualified names, but simple names need to be resolved differently. What NED does is this: it determines which interface the module or channel type must implement (i.e. ... like INode), and then collects the types that have the given simple name AND implement the given interface. There must be exactly one such type, which is then used. If there is none or there are more than one, it will be reported as an error.
Let us see the following example:
module MobileHost
{
    parameters:
        string mobilityType;
    submodules:
        mobility: <mobilityType> like IMobility;
        ...
}
and suppose that the following modules implement the IMobility module interface: inet.mobility.RandomWalk, inet.adhoc.RandomWalk, inet.mobility.MassMobility. Also suppose that there is a type called inet.examples.adhoc.MassMobility but it does not implement the interface.
So if mobilityType="MassMobility", then inet.mobility.MassMobility will be selected; the other MassMobility doesn't interfere. However, if mobilityType="RandomWalk", then it is an error because there are two matching RandomWalk types. Both RandomWalk's can still be used, but one must explicitly choose one of them by providing a package name: mobilityType="inet.adhoc.RandomWalk".
It is not mandatory to make use of packages: if all NED files are in a single directory listed on the NEDPATH, then package declarations (and imports) can be omitted. Those files are said to be in the default package.