The make invocation can be configured on C/C++ Build page of the Project Properties dialog. Most settings are already set correctly and do not need to be changed. One exception is the Enable parallel build option on the Behavior tab that you may want to enable, especially if you have a multi-core computer.
Warning
Do not set the number of parallel jobs to be significantly higher than the number of CPU cores you have. In particular, never turn on the Use unlimited jobs option, as it will start an excessive number of compile processes, and can easy consume all available memory in the system.We do not recommend that you change any setting on property pages under the C/C++ Build tree node.
A project may have several build configurations, where each configuration describes the selected compiler toolchain, debug or release mode, any potential extra include and linker paths, defined symbols, etc. You can activate, create or delete build configurations under the Build Configurations submenu of the project context menu.
Note
Make sure that the names of all configurations contain the "debug" or the "release" substring. The IDE launcher uses the name of the configuration to switch the matching configuration depending whether you want to debug or run the simulation.OMNeT++ uses makefiles to build the project. You can use a single makefile for the whole project, or a hiearchy of makefiles. Each makefile may be hand-written (i.e. provided by you), or generated automatically. The IDE provides several options for automatically created makefiles.
The build system for an OMNeT++ project can be configured on the OMNeT++ | Makemake page of the Project Properties dialog. All settings you do in this page will affect all build configurations.
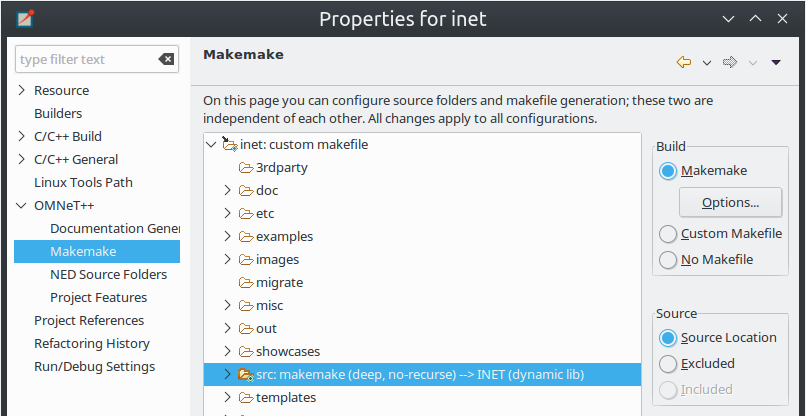
The page displays the folder tree of the project. Using controls on the page (Build group in the top-right corner), you can declare that a selected folder contains a hand-written (custom) makefile, or tell the IDE to generate a makefile for you. Generated makefiles will be automatically refreshed before each build. If a makefile is configured for a folder, the makefile kind will be indicated with a small decoration on the folder icon.
The build root folder is indicated with a small arrow. This is the folder in which the IDE's Build function will invoke the make command, so it should contain a makefile. It is expected that this makefile will build the whole project, so it is supposed to invoke all other makefiles, either directly or indirectly. By default, the build root folder is the project root. This is usually fine, but if you really need to change the project build root, overwrite the Build location setting in the C/C++ Build page of the same dialog.
Note
All generated makefiles will be namedMakefile;
custom makefiles are also expected to have this name.
In addition to makefiles, you also need to specify where your C++ files are
located (source folders). This is usually the src folder of the project,
or, for small projects, the project root. It is also possible to exclude folders
from a source folder. The controls on the right-bottom part of the dialog
(Source group) allow you to set up source folders and exclusions on
the project. Source files that are outside source folders or are in an excluded
folder will be ignored by both the IDE and the build process.
Note
Source folders and exclusions that you configure on this page actually modify the contents of the Source Location tab of the C++ General | Paths and Symbols page of the project properties dialog; the changes will affect all build configurations.Automatically created makefiles are by default deep, meaning that they include all (non-excluded) source files under them in the build. That is, a source file will be included in the build if it is both under a source folder and covered by a makefile. (This applies to automatically generated makefiles; the IDE has obviously no control over the behaviour of custom makefiles.)
Makefile generation for the selected folder can be configured on the Makemake Options dialog, which can be brought up by clicking the Options button on the page. The dialog is described in the next section.
Makefile generation for a folder can be configured in the Makemake Options dialog. To access the dialog, open the OMNeT++ | Makemake page in the Project Properties dialog, select the folder, make sure makefile generation is enabled for it, and click the Options button.
The following sections describe each page of the dialog.
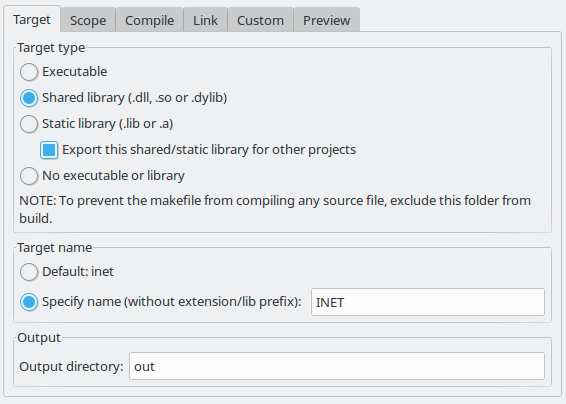
On the first, Target tab of the dialog, you can specify how the final target of the makefile is created.
- Target type: The build target can be an executable, a shared or static library,
or the linking step may be omitted altogether.
Makemake options:
--make-so,--make-lib,--nolink - Export this shared/static library for other projects: This option is observed
if a library (shared or static) is selected as target type, and works in conjunction
with the Link with libraries exported from referenced projects option on the Link tab.
Namely, referencing projects will automatically link with this library if both the library is
exported from this project AND linking with exported libraries is enabled in the referencing project.
Makemake option:
--meta:export-library - Target name: You may set the target name. The default value is derived from the project name.
Makemake option:
-o(If you are building a debug configuration, the target name will be implicitly suffixed by the_dbgstring.) - Output directory: The output directory specifies where the object files and the final target
will be created, relative to the project root. Makemake option:
-O
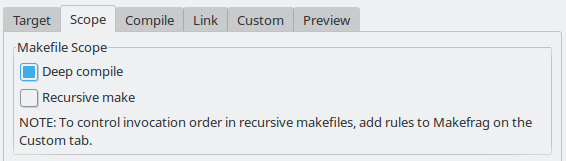
The Scope tab allows you to configure the scope of the makefile and which source files will be included.
- Deep compile: When enabled, the makefile will compile the source files in the whole
subdirectory tree (except excluded folders and folder covered by other makefiles).
When disabled, the makefile only compiles sources in the makefile's folder.
Makemake option:
--deep - Recursive make: When enabled, the build will invoke make in all descendant folders
that are configured to contain a makefile.
Makemake option:
--meta:recurse(resolves to multiple-doptions) - More » Additionally invoke make in the following directories:
If you want to invoke additional makefiles from this makefile, specify which directories
should be visited (relative to this makefile). This option is useful if you want to
invoke makefiles outside this source tree.
Makemake option:
-d
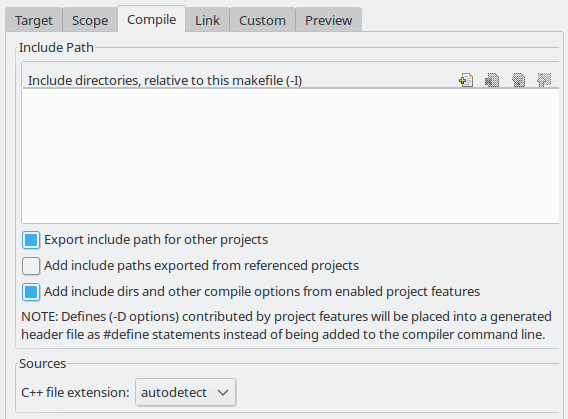
The Compile tab allows you to adjust the parameters passed to the compiler during the build process.
Settings that affect the include path:
- Export include path for other projects makes this project's include path available for other dependent projects. This is usually required if your project expects that other independent models will extend it in the future.
- Add include paths exported from referenced projects allows a dependent project to use header files from the dependencies if those projects have exported their include path (i.e. the above option was turned on.)
- Add include dirs and other compile options from enabled project features: Project features may require additional include paths and defines to compile properly. Enabling this option will add those command line arguments (specified in the .oppfeatures file) to the compiler command line.
Source files:
- C++ file extension: You can specify the source file extension you are
using in the project (
.ccor.cpp). We recommend that you use.ccin your projects. Makemake option:-e
Link options allow the user to fine-tune the linking steps at the end of the build process.
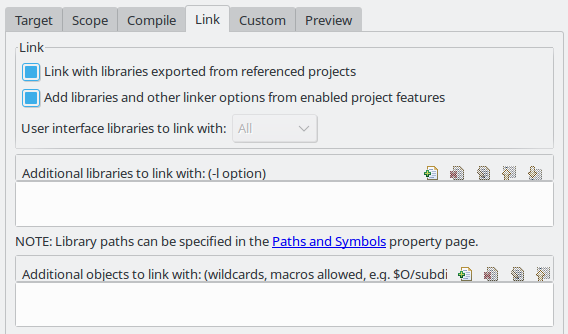
- Link with libraries exported from referenced projects: If your project references other projects
that build static or dynamic libraries, you can instruct the linker to
automatically link with those libraries by enabling this option. The libraries from
the other projects must be exported via the Export this shared/static library for other projects
option on the Target tab.
Makemake option:
--meta:use-exported-libs - Add libraries and other linker options from enabled project features: Project features may require additional libraries and linker options to build properly. Enabling this option will add those command line arguments (specified in the .oppfeatures file) to the linker command line.
- User interface libraries to link with: If the makefile target is an executable, you may
specify which OMNeT++ user interface libraries (Cmdenv, Tkenv, or both) should be linked
into the program.
Makemake option:
-u - More » Additional libraries to link with: This box allows you to specify
additional libraries to link with. Specify the library name without its path, possible prefix (
lib) and file extension, and also without the-loption. The library must be on the linker path; the linker path can be edited on the Library Paths tab of the C/C++ General | Paths and Symbols page of the Project Properties dialog. Makemake option:-l - More » Additional objects to link with: Additional object files and libraries can be
specified here. The files must be given with their full paths and file extension. Wildcards
and makefile macros are also accepted. Example:
$O/subdir/*.o. Makemake option: none (files will become plain makemake arguments)
The Custom tab allows the customization of the makefiles by inserting handwritten makefile fragments into the automatically generated makefile. This lets you contribute additional targets, rules, variables, etc.
- Makefrag: If the folder contains a file named
makefrag, its contents will be automatically copied into the generated makefile, just above the first target rule.makefragallows you to customize the generated makefile to some extent; for example, you can add new targets (e.g. to generate documentation or run a test suite), new rules (e.g. to generate source files during the build), override the default target, add new dependencies to existing targets, overwrite variables, etc. The dialog lets you edit the contents of themakefragfile directly (it will be saved when you accept the dialog). - More » Fragment files to include: Here, it is possible to explicitly specify
a list of makefile fragment files to include, instead of the default
makefrag. Makemake option:-i
The Preview tab displays the command line options that will be passed to
opp_makemake to generate the makefile. It consists of two parts:
- Makemake options: This is an editable list of makefile generation options.
Most options map directly to checkboxes, edit fields and other controls on the
previous tabs of the dialog. For example, if you check the Deep compile checkbox
on the Scope tab, the
--deepoption will be added to the command line. Conversely, if you delete--deepfrom the command line options, that will cause the Deep compile checkbox to be unchecked. Some options are directlyopp_makemakeoptions, others are "meta" options that will be resolved to one or moreopp_makemakeoptions; see below. - Makemake options modified with CDT settings and with meta-options resolved:
This is a read-only text field, displayed for information purposes only.
Not all options in the above options list are directly understood by
opp_makemake; namely, the options that start with--meta:denote higher-level features offered by the IDE only. Meta options will be translated toopp_makemakeoptions by the IDE. For example,--meta:auto-include-pathwill be resolved by the IDE to multiple-Ioptions, one for each directory in the C++ source trees of the project. This field shows theopp_makemakeoptions after the resolution of the meta options.
When your project references another project (say the INET Framework), your project's build will be affected in the following way:
- Include path: Source folders in referenced projects will be automatically added to the include path of your makefile if the Add include paths exported from referenced projects option on the Compile tab is checked where the referenced projects also enable the Export include path for other projects option.
- Linking: If the Link with libraries exported from referenced projects option on the Link tab is enabled, then the makefile target will be linked with those libraries in referenced projects that have the Export this shared/static library for other projects option checked on the Target tab.
- NED types: NED types defined in a referenced project are automatically available in referencing projects.