Long compile times are often an inconvenience when working with large OMNeT++-based model frameworks like the INET Framework. The IDE feature named Project Features lets you reduce build times by excluding or disabling parts of the model framework that you do not use for your simulation study. For example, when you are working on mobile ad-hoc simulations in INET, you can disable the compilation of Ethernet, IPv6/MIPv6, MPLS, and other unrelated protocol models. The word feature refers to a piece of the project codebase that can be turned off as a whole.
Additional benefits of project features include a less cluttered model palette in the NED editor, being able to exclude code that does not compile on your system, and enforcing cleaner separation of unrelated parts in the model framework.
Note
A similar effect could also achieved via breaking up the model framework (e.g. INET) into several smaller projects, but that would cause other kinds of inconveniences for model developers and users alike.Features can be defined per project. As already mentioned, a feature is a piece of the project codebase that can be turned off as a whole, that is, excluded from the C++ sources (and thus from the build) and also from NED. Feature definitions are typically written and distributed by the author of the project; end users are only presented with the option of enabling/disabling those features. A feature definition contains:
- ID, which is a unique identifier inside the feature definition file.
- Feature name, for example
"UDP"or"Mobility examples". - Feature description. This is a few sentences of text describing what the feature
is or does; for example
"Implementation of the UDP protocol". - Labels. This is list of labels or keywords that facilitate grouping or finding features.
- Initially enabled. This is a boolean flag that determines the initial enablement of the feature.
- Required features. Some features may be built on top of others; for example, a HMIPv6 protocol implementation relies on MIPv6, which in turn relies on IPv6. Thus, HMIPv6 can only be enabled if MIPv6 and IPv6 are enabled as well. This is a space-separated list of feaure IDs.
- NED packages. This is a space-separated list of NED package names that identify the code that implements the feature. When you disable the feature, NED types defined in those packages and their subpackages will be excluded; also, C++ code in the folders that correspond to the packages (i.e. in the same folders as excluded NED files) will also be excluded.
- Extra C++ source folders. If the feature contains C++ code that lives outside NED source folders (nontypical), those folders are listed here.
- Compile options, for example
-DWITH_IPv6. When the feature is enabled, the compiler options listed here are either added to the compiler command line of all C++ files or they can be used to generate a header file containing all these defines so that header file can be included in all C++ files. A typical use of this field is defining symbols (WITH_xxx] that allows you to write conditional code that only compiles when a given feature is enabled. Currently only the-Doption (define symbol) is supported here. - Linker options. When the feature is enabled, the linker options listed here are added
to the linker command line. A typical use of this field is linking with additional
libraries that the feature's code requires, for example libavcodec.
Currently only the
-loption (link with library) is supported here.
Features can be viewed, enabled and disabled on the Project Features page of the Project Properties dialog. The Project | Project Features... menu item is a direct shortcut to this property page.
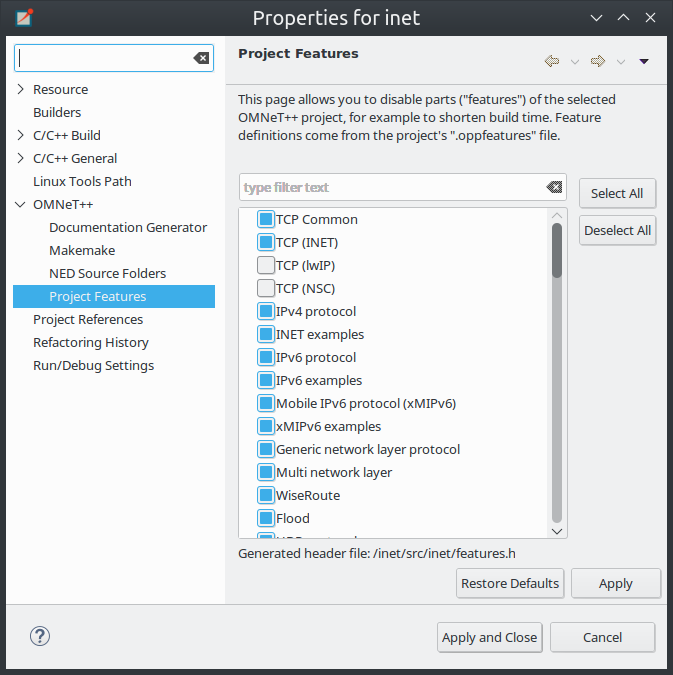
The central area of the dialog page lists the features defined for the project. Hovering the mouse over a list item will show the description and other fields of the feature in a tooltip window. Check an item to enable the feature, and uncheck to disable.
When you enable a feature that requires other features to work, the dialog will ask for permission to enable the required features as well. Also, if you disable a feature that others depend on, they will be disabled, too.
The Apply, OK and Cancel buttons work as expected. Restore Defaults restores the features to their initial state (see the Initially enabled attribute above).
Above the list there is a notification area in the dialog. If the IDE detects that your project's configuration is inconsistent with the feature enablements, it will display a warning there, and offer a way to automatically fix the problems. Fixing means that the IDE will adjust the project's NED and C++ settings to make them consistent with the feature enablements. Such check is also performed just before build.
When you enable or disable a feature on the Project Features page, a number of project settings will be modified:
- NED package exclusions. This corresponds to the contents of the Excluded package subtrees list on the NED Source Folders property page. When a feature is disabled, its NED packages will be excluded (added to the list), and vice versa.
- C++ folder exclusions. This can be viewed/edited on the Makemake property page, and also on the Source Location tab of the C/C++ General > Paths and Symbols property page.
-
Compile options. For example, if the feature defines preprocessor symbols (
-DWITH_xxx), they can be used to generate a header file that contains the enabled macro definitions and that file can be included in all C++ files. - Linker options. For example, if the feature defines additional libraries to link with, they will be displayed on the Libraries tab of the C/C++ General > Paths and Symbols property page.
Note
Feature enablements are saved to the.oppfeaturestate file in the project root.
Project Features can be easily configured from the IDE, but command line tools
(opp_makemake, etc.) can also use them with the help of the opp_featuretool
command.
If you want to build the project from the command line with the same feature
combination the IDE is using, you need to generate the makefiles with the same opp_makemake
options that the IDE uses in that feature combination. The opp_featuretool makemakeargs
command (executed in the project's root directory) will show all the required
arguments that you need to specify for the opp_makemake command to
build the same output as the IDE. This allows you to keep the same
features enabled no matter how you build your project.
Alternatively, you can choose Export on the Makemake page, and copy/paste the
options from the generated makemakefiles file. This method is
not recommended, because you must redo it manually each time after changing
the enablement state of a feature.
Project features are defined in the .oppfeatures file in your project's
root directory. This is an XML file, and it currently has to be written by hand
(there is no specialized editor for it).
The root element is <features>, and it may have several <feature>
child elements, each defining a project feature. Attributes of the <features>
element define the root(s) of the source folder(s) (cppSourceRoots) and the name of a
generated header file that contains all defines specified by the compilerFlags
attribute in the enabled features. The fields of a feature
are represented with XML attributes; attribute names are id, name,
description, initiallyEnabled, requires, labels, nedPackages,
extraSourceFolders, compileFlags and linkerFlags. Items within attributes
that represent lists (requires, labels, etc.) are separated by spaces.
Here is an example feature from the INET Framework:
<features cppSourceRoots="src" definesFile="src/inet/features.h">
    <feature
        id="TCP_common"
        name="TCP Common"
        description = "The common part of TCP implementations"
        initiallyEnabled = "true"
        requires = ""
        labels = ""
        nedPackages = "
                       inet.transport.tcp_common
                       inet.applications.tcpapp
                       inet.util.headerserializers.tcp
                      "
        extraSourceFolders = ""
        compileFlags = "-DWITH_TCP_COMMON"
        linkerFlags = ""
    />
If you plan to introduce a project feature in your project, here's what you'll need to do:
- Isolate the code that implements the feature into a separate source directory (or several directories). This is because only whole folders can be declared as part of a feature, individual source files cannot.
-
Check the remainder of the project. If you find source lines that reference
code from the new feature, use conditional compilation (
#ifdef WITH_YOURFEATURE) to make sure that code compiles (and either works sensibly or throws an error) when the new feature is disabled. (Your feature should define theWITH_YOURFEATUREsymbol, i.e.-DWITH_YOURFEATUREwill need to be added to the feature compile flags.) -
Add the feature description into the
.oppfeaturesfile of your project including the required feature dependencies. -
Test. At the minimum, test that your project compiles at all, both with the
new feature enabled and disabled. More thorough, automated tests can be built using
opp_featuretool.